Tutorial ( go to french page )
Thx to Sting-Ray for translation
- Adding an annotation
- Copying and Pasting
- Creating Routes and Areas
- Inserting Redirections (Locref)
- Connecting Annotations using Hyperlinks (Advanced)
When you add annotations, your changes are saved in separate files to the database. If you would like your information added to the official database, click on the envelope icon and choose your method of sending. The Direct HTTP option is the simplest and most effective method.
Adding an Annotation [ return ]
To be able to make any annotations, you will first need to activate "Edition mode". To do this, click the button with the pen icon:
When "Edition mode" is activated, you have to re-select which database you intend modifying. Please take the time to read all other notices if you intend submitting your contributions.
The cartographer allows you to zoom in on the maps:
When adding annotations, it can be a lot easier when zoomed in.
The zoom function is available various ways:
Using the mouse wheel, the + and - keys or by double clicking mouse (which makes it possible to go directly to the maximum zoom and center on the zone concerned.
Once zoomed in, point at the desired place and then either left shift-click (goes straight to addition mode), or click right to obtain the popup, or press the "I" key .
The dialog for the annotations opens - you can set all kinds of details concerning what you wish to add.
- This field is compulsory. Its recommended to use the appropriate language for the database.
- Category of annotation. This parameter is compulsory. In order to standardise the contributions please adhere to the notes in [6].
- Any further notes as necessary, note here that the word "Billy Maclure" is surrounded by the brackets { and } that will tell cartographer to create a link between bond between "Auntie Bernice Stonefield" and "Billy Maclure". If the annotation "Billy Maclure" exists, the program will be able to point the user directly to it and to post a hyperlink when "Auntie Bernice Stonefield" is selected. (Note that so it functions properly, it is necessary to ensure that the names are exactly the same.)
- Type of creature when it is possible to define it (human, animal etc...)
- Minimum and maximum level of the creature or the place.
- In order to standardise the contributions please adhere to the notes displayed here.
- Special tags. These tags allow more precise details to be linked in to the database. Assists with optimising the searches, and helps avoid having to type common info in.
Tip: To create hyperlinks, another method is to highlight the appropriate text, and then right click on it and select "Add { }". Another method for creating hyperlinks is detailed here .

Tip: To indicate the levels, you can use the "level wizard" to indicate the level of your character and click the color. This can be useful to define levels in an easier way:

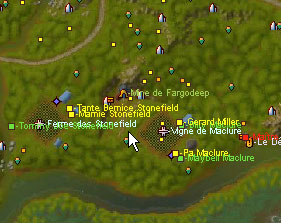
Once added, the annotation appears on the map. As we incorporated a hyperlink, it shows on the map as an orange line linking the two objects. By right clicking the object, you can quickly jump to the linked objects.
Copying and Pasting [ return ]
Because many annotations can be the same (especially in the case of common monsters), it is useful to be able to Cut/Copy/Paste - in order to avoid having to create each item repeatedly.
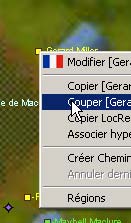
To Copy: Right click on the object you wish to copy. Choose Copy from the menu.
If you right click an empty spot on the map, the option to paste will now be available. Simply click paste, and a new annotation will be added with the same details as the old one, only its location will be different.
To Cut: This works exactly the same as Copy, except it removes the original.
Tip: Using Cut and Paste allows you to easily move an annotation while preserving the original attributes (including paths, etc...)
Creating Routes and Areas [ return ]
To create a path of a travelling merchant or monster:
Right click the appropriate annotation. Click "Create Path" - the number between [] indicates the number of waypoints the path contains (no path - 0)
This places Cartographe into Waypoint mode
Hold shift and click some linear points on the map to create the path. (Try to minimize the number of Waypoints)
Tip: It is possible to remove the last waypoint by selecting "Clear last WP" from the annotation's context menu (Right click). To clear the path, just choose "Create Path" again, and Waypoint mode will be cancelled. All normal zoom and movement methods are supported in Waypoint Mode.
Once you've traced the path, right click the object and choose "Modify"
In the modification dialog, choose the "Commands" tab.
Then click "Link Way"
The path is linked by a coded line. A dialog will open asking you to choose the color and transparency of the path.
The following options are available:
- Colors: "By Default" means the path will take the color of the annotation (i.e. based on the level)
Sometimes it can be helpful to choose a specific color - based on the color of the area. - Transparency makes it possible "to melt" the path into the background.
- Always visible enables you to make the path always visible - even if zoomed out.
The path appears in yellow because its connected annotation is selected, afterwards it takes the appropriate color.
Holding the mouse over the path will show the annotation's information.
Creating surface areas is done in much the same way:
Create the area, then choose "Link Surface"
The area is then created - but this time it only shows when the annotation is selected, so as not to obscure the map normally.
Inserting Redirections (Locref) [ return ]
The Cartographer now relies on a system called "Loc Ref"
The principle is simple - a locref contains the ID of a precise place (the area and location).
If you click on an annotation that has a locref as a command, the map automatically centres on a destination.
Example, with a City entrance:
Copy the LocRef of the one point via the context menu (Right click)
Paste this into the Command field on the other annotation and click the "Redirect" button.
Now you can click on the "Undercity" ref and get sent directly to the map of that city, centered around the appropriate point.
Connecting Annotations using Hyperlinks (Advanced) [ return ]
Still to be completed...


